


%20(1).png)
Integrating QuickBooks with Salesforce bridges the gap between finance and sales, enabling real-time visibility into customer transactions, reducing manual data entry, and accelerating decision-making. This guide walks you through how to connect the two systems using Make.com, covering key benefits, setup requirements, and step-by-step automation to boost efficiency and drive smarter business operations
The Value of Integrating QuickBooks with Salesforce
Connecting QuickBooks with Salesforce unlocks a range of advantages that benefit both sales and finance teams:
- Instant Financial Visibility: Sales representatives gain immediate access to updated details on invoices, payments, and account statuses directly within Salesforce.
- Boosted Productivity: Automation eliminates repetitive data entry, saving valuable time and reducing the likelihood of errors.
- Improved Customer Satisfaction: Quick access to financial information enables sales teams to respond promptly and effectively, strengthening client relationships.
- Enhanced Reporting: Unified data supports robust financial and sales analytics, facilitating strategic planning and forecasting.
This integration fosters a collaborative environment, driving efficiency and growth across your organization.
Available Option of Integration
1. Custom Apex Integration:
QuickBooks offers a pre-built connector via the Salesforce AppExchange, ideal for basic sync needs but limited in customization. Apex-based integration gives you complete control to build a tailored connection between Salesforce and QuickBooks, perfectly aligned with your business processes. It's highly scalable and secure, but requires strong development expertise and time investment. Best suited for complex use cases where off-the-shelf solutions fall short.
2. 3rd Party AppExchange Apps:
AppExchange apps like Breadwinner or DBSync offer ready-made integrations with robust features and minimal setup time. They’re great for quick deployments and ongoing support, but come with recurring costs and limited flexibility if your business needs go beyond what’s built in. Ideal for standard accounting workflows.
3. Middleware Tools (Make.com, Zapier):
No-code platforms like Make.com and Zapier allow you to connect Salesforce and QuickBooks quickly using visual workflows. These tools are easy to use and budget-friendly, making them perfect for smaller teams or simpler automations. However, they can fall short on security, error handling, and handling complex logic or large data volumes.
In this guide, We will choose Make.com as an option because it is an easy to implement/manage and cost effective integration Option. We have done multiple integrations for our customers and it is working great.
Why Choose Make.com or other No-Code Tools for Integration?
Make.com stands out as an ideal automation platform for this integration due to its user-friendly design and robust capabilities. Here’s why it’s a top choice:
- No-Code Flexibility: Its intuitive drag-and-drop interface allows users to build custom workflows without coding expertise.
- It does the Job: it connects Salesforce and QB with visual workflow and runs smoothly without any problems.
- Scalable Automation: Supports complex workflows with triggers, actions, and conditions tailored to business needs.
- Cost-Effective Solution: Offers a budget-friendly alternative to custom development, with scalable pricing plans.
Make.com’s versatility makes it perfect for businesses seeking efficient, tailored integrations without heavy technical investment.
Prerequisites for Integration
To embark on this integration journey, ensure the following are in place:
- Active subscriptions to Salesforce (with API access) and QuickBooks Online.
- A Make.com account to design and manage automated workflows.
- Administrative privileges across all platforms for configuration.
- A basic understanding of the interfaces to streamline the setup process.

Step-by-Step Process to Integrate QuickBooks with Salesforce Using Make.com
This guide presents a versatile workflow to synchronize data between Salesforce and QuickBooks. Imagine a scenario where marking an invoice as "Paid" in Salesforce automatically generates a matching invoice and payment record in QuickBooks.
Step 1: Configure and Link Applications
- Access Make.com: Log in to your Make.com account.
- Initiate a New Scenario: Select "Create a New Scenario" and assign a descriptive name (e.g., "QuickBooks-Salesforce Sync") for easy tracking.

Step 2: Establish Triggers and Define Actions
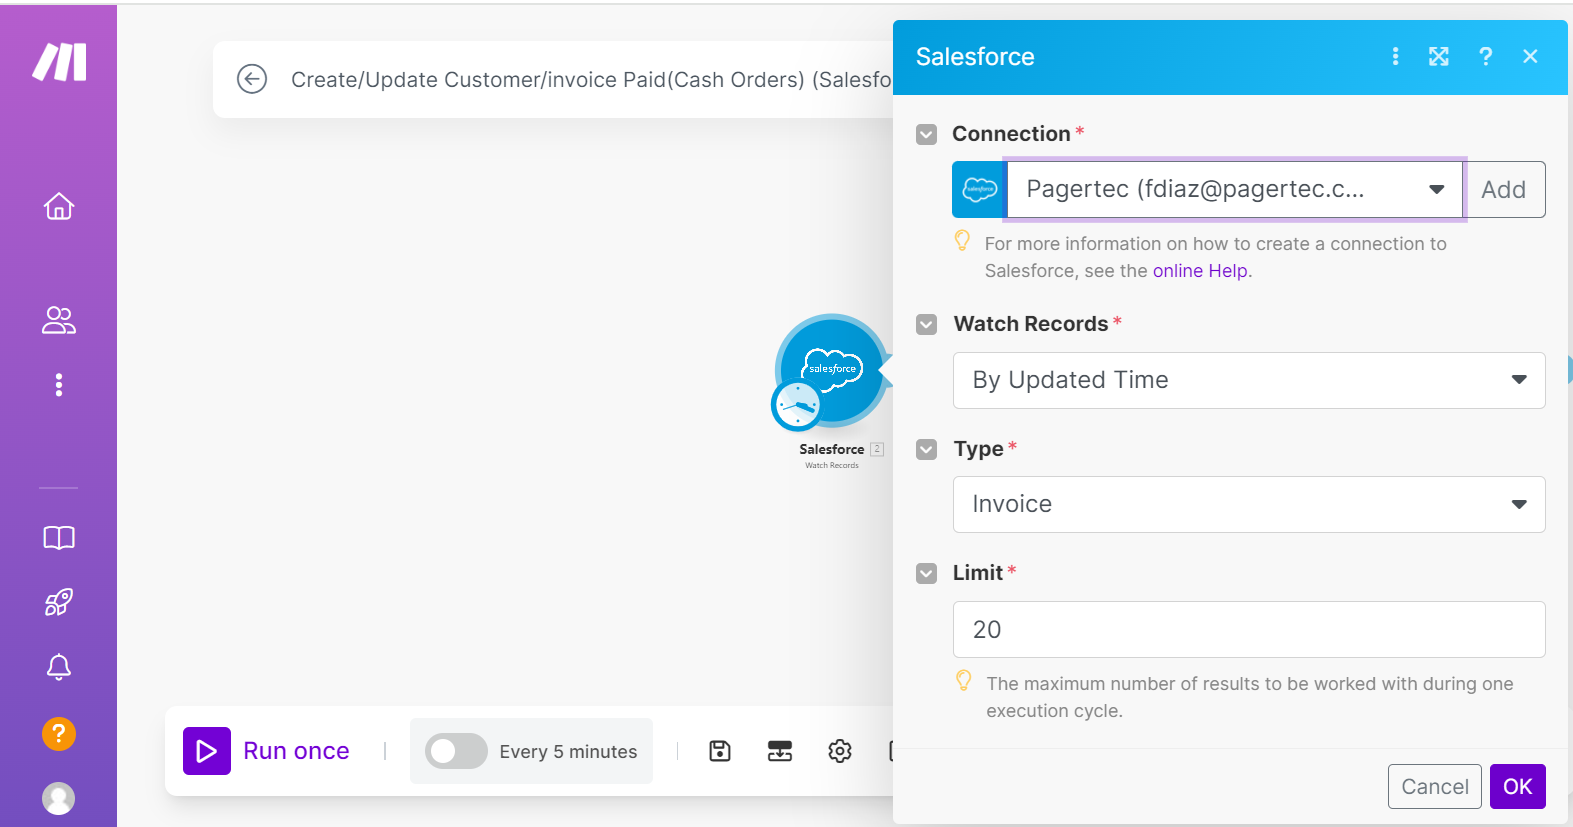
1. Configure the Trigger:
- Integrate the Salesforce module from the Make.com app directory.
- Opt for the "Watch Records" module to detect changes in Salesforce.
- Authenticate your Salesforce account as prompted.
- Set the module to monitor the Invoice object (or your custom object) for updates.
2. Customize the Trigger Settings:
- Set "Watch Records" to track modifications by updated time.
- Select the Invoice object and define a record limit (e.g., 20) based on your requirements.
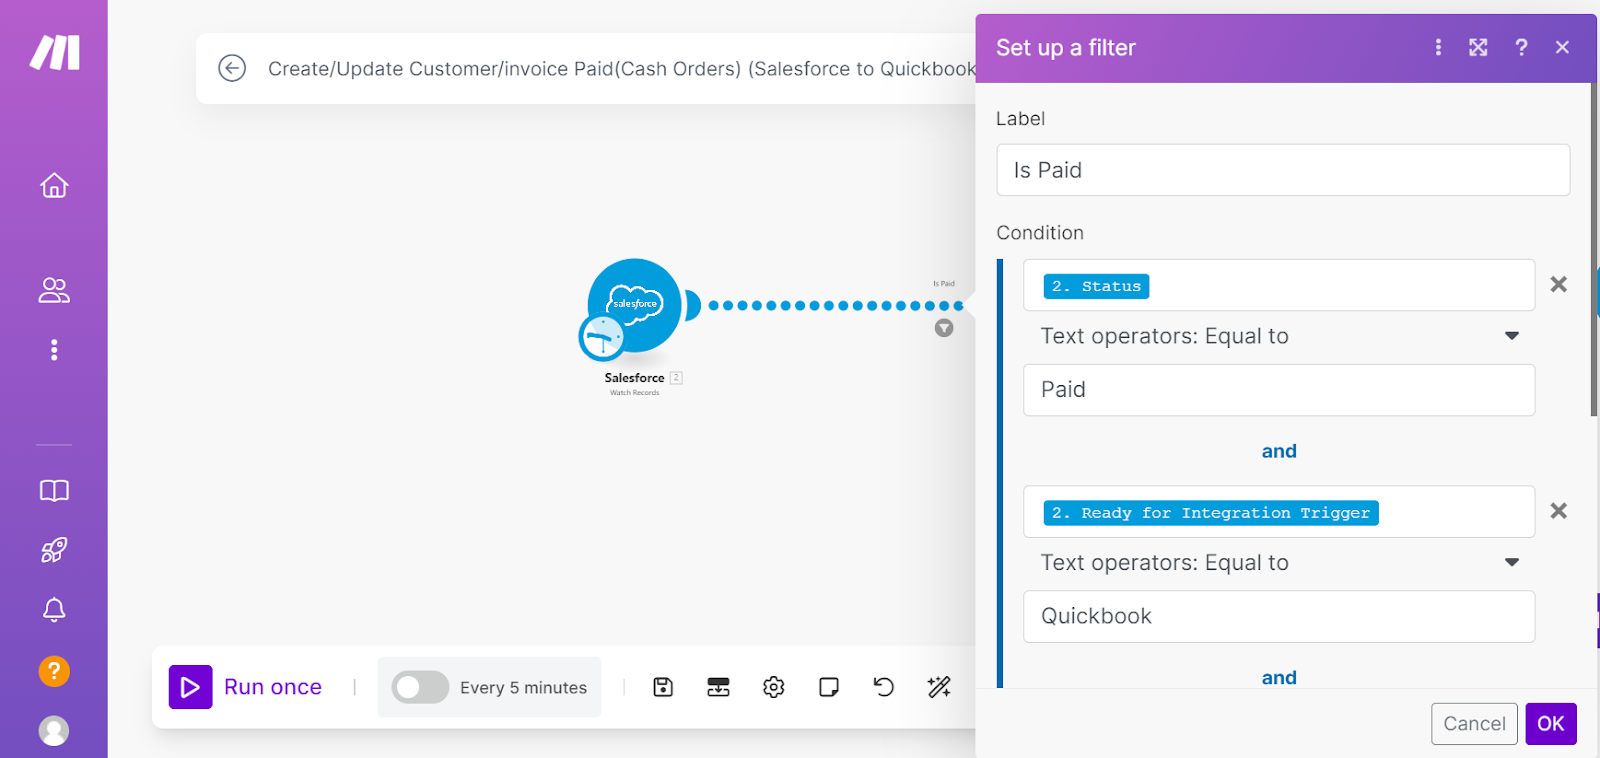
3. Apply Conditions:
- Add a filter to process only invoices with a "Paid" status (e.g., Status = "Paid").
- Incorporate a custom field (e.g., "Sync Status") to ensure single execution (set to "Pending" initially, update to "Synced" afterward).
- Include conditions like a positive amount (e.g., Amount > 0) to meet QuickBooks standards.
4. Avoid Duplication:
- Update the "Sync Status" field to "Synced" post-execution to prevent reprocessing.
Step 3: Retrieve Related Customer Information
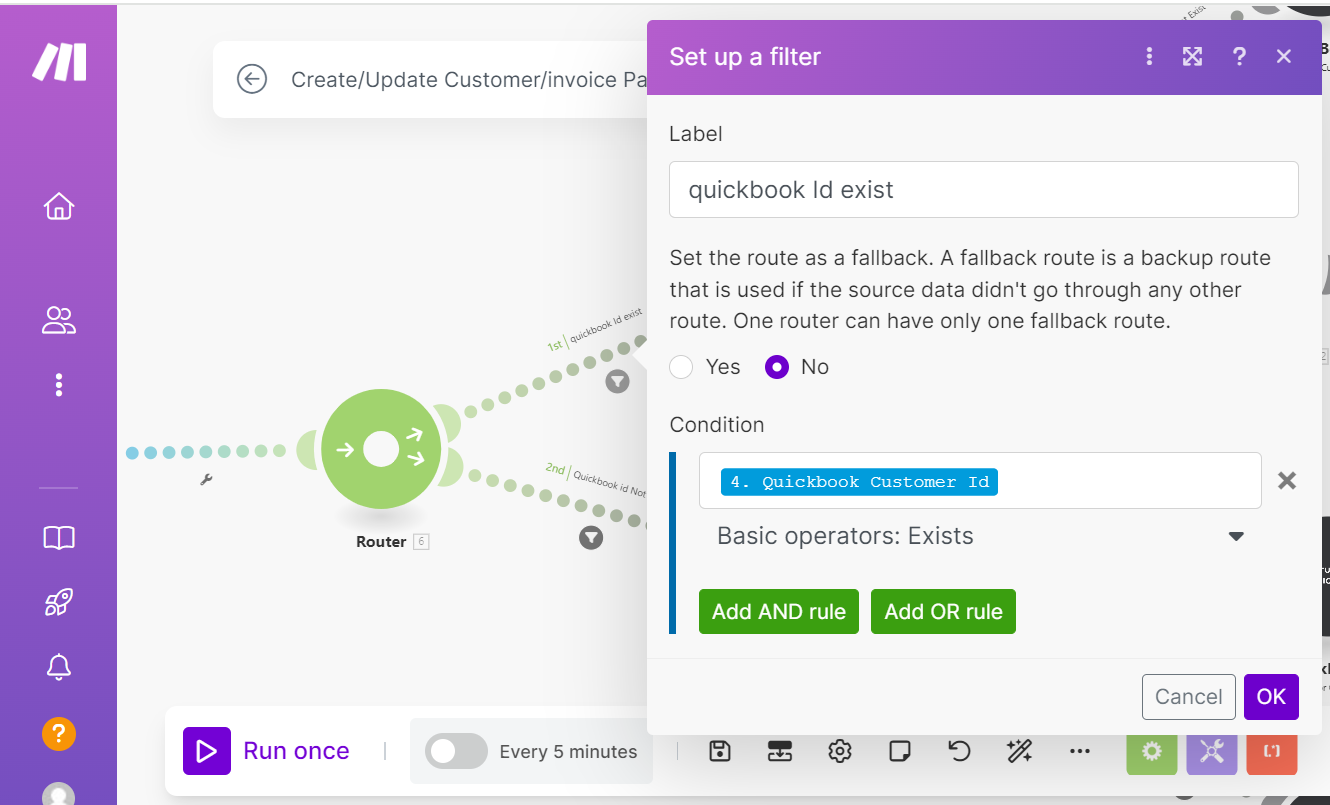
- Leverage the Account or Contact ID from the Invoice to extract customer details using a "Search Records" module in Salesforce.
- Apply a filter to verify the presence of a QuickBooks Customer ID in the Salesforce record.
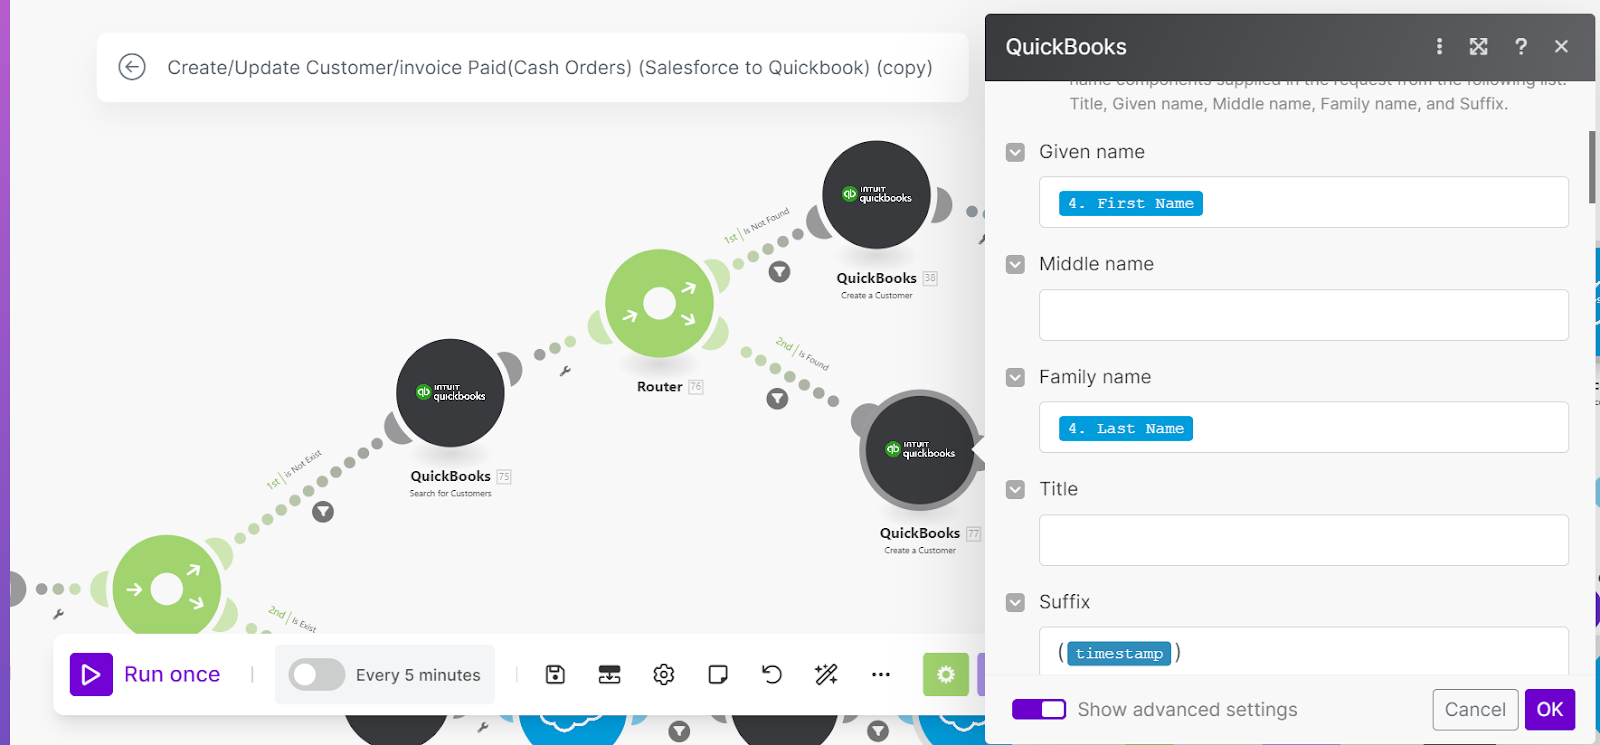
Step 4: Manage New or Existing Customers in QuickBooks
- For Existing Customers: Proceed directly to invoice creation using the QuickBooks Customer ID.
- For New Customers:
- Create a new customer in QuickBooks using Salesforce data (e.g., name, email, address).
- Update the Salesforce record with the newly assigned QuickBooks Customer ID.
Step 5: Addressing Duplicate Names in QuickBooks Integration
In QuickBooks, customer display names must be unique to avoid conflicts, which can arise when multiple customers share the same name (e.g., two "John Doe" entries). This can lead to errors or overwritten data during Salesforce sync, disrupting reporting and tracking.
- Solution: Before creating a new customer, use the "Search Customer" module in Make.com to check for existing names. If a match is found, append a unique identifier (e.g., "John Doe_20250421" with a timestamp or random digits). Then, update the Salesforce record with the new name and QuickBooks Customer ID to ensure consistency and prevent future conflicts. This simple step maintains data integrity across both platforms.
Step 6: Generate and Update Invoices in QuickBooks
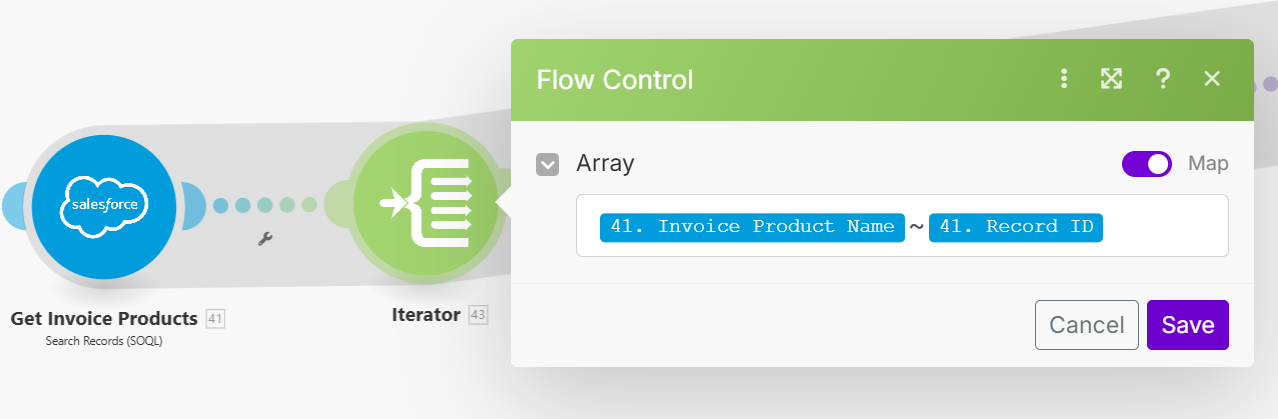
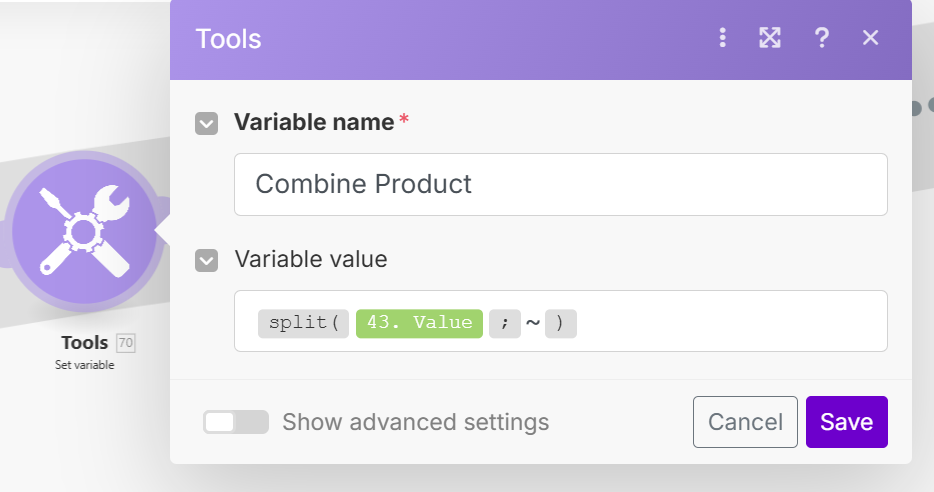
- Fetch Line Items:
- Use "Search Records" to retrieve line items based on the Invoice ID.
- Employ an "Iterator" to loop through items, mapping Product Name and Line Item ID.
- Use "Set Variable" to organize these into an array for processing.
- Map Products and Line Items:
- Utilize the "QuickBooks Search Item" module to locate products.
- Retrieve line item details (e.g., quantity, unit price) from Salesforce.
- Use "Array Aggregator" to assemble line items in a QuickBooks-compatible format.
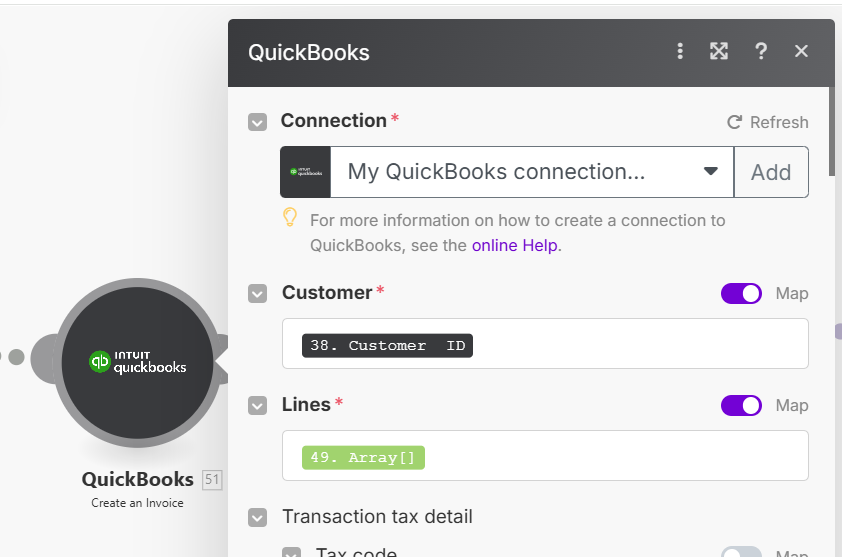
- Create Invoice:
- Add the "Create Invoice" action in the QuickBooks module.
- Map fields (e.g., customer ID, line items, total amount) from Salesforce.
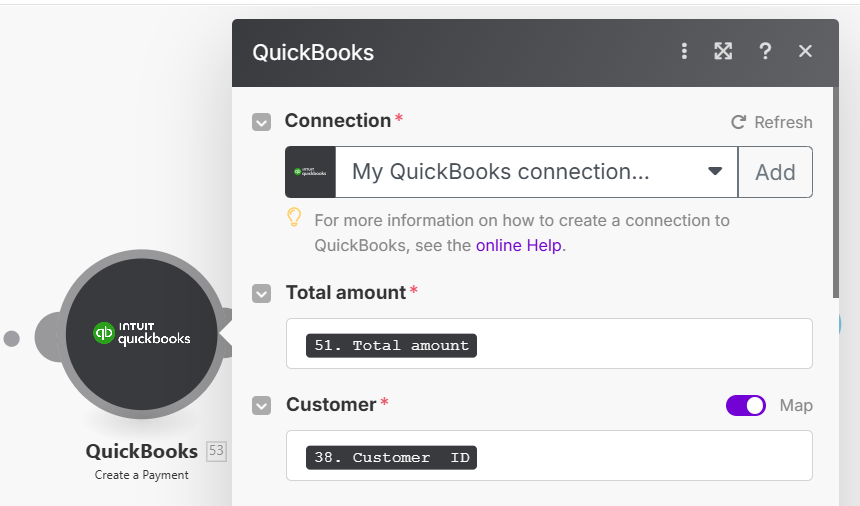
- Mark as Paid:
- Use the "Create Payment" module to associate a payment with the invoice, mapping amount and method.
- Update Salesforce:
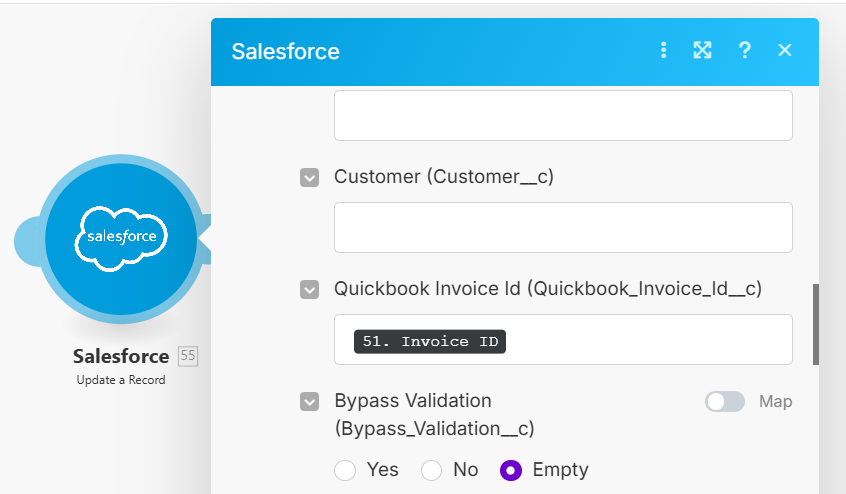
- Record the QuickBooks Invoice ID in the Salesforce entry.
- Set "Sync Status" to "Synced".
Step 7: Test the Workflow
- Execute in Test Mode: Run the scenario with a sample invoice (e.g., Status = "Paid", Amount = $1,000, Account = "Sample Corp").
- Validate in QuickBooks: Confirm the creation of a customer and invoice with accurate details.
- Troubleshoot: Review Make.com run logs for errors and refine mappings as needed.
Step 8: Activate and Monitor the Scenario
- Enable the Workflow: Switch on the scenario for real-time operation.
- Set Schedule (Optional): Configure a frequency (e.g., every 15 minutes) .
Conclusion
Integrating QuickBooks with Salesforce using Make.com revolutionizes data synchronization, eliminates manual efforts, and provides real-time financial insights to boost decision-making. This guide offers a flexible blueprint to adapt workflows to your business requirements, harnessing Make.com’s no-code platform. By implementing these steps, you can optimize operations, minimize errors, and fully leverage the potential of your Salesforce and QuickBooks ecosystem. Dive into this integration today and elevate your business automation to new heights!
Integrating QuickBooks with Salesforce using Make.com revolutionizes data synchronization, eliminates manual efforts, and provides real-time financial insights to boost decision-making. This guide offers a flexible blueprint to adapt workflows to your business requirements, harnessing Make.com’s no-code platform. By implementing these steps, you can optimize operations, minimize errors, and fully leverage the potential of your Salesforce and QuickBooks ecosystem. Dive into this integration today and elevate your business automation to new heights!


.png)
