
If you are working in Salesforce, you already know the drill: switching tabs, running reports, and re checking record details before every decision. Connecting Claude to Salesforce through a Hosted MCP (Model Context Protocol) server changes that. You can ask Claude a plain English question about your accounts, opportunities, or contacts, and it retrieves live, permission checked answers straight from your org, no exports, no copy pasting, no shared login.
This guide walks through the entire setup from scratch: activating the right Salesforce servers, registering an OAuth app, connecting Claude, and confirming everything works. It's written for Salesforce admins who are comfortable in Setup but have never wired up an MCP server before.
What Is a Salesforce Hosted MCP Server, Really?
MCP (Model Context Protocol) is the standard that lets an AI assistant like Claude call external tools safely, without the assistant ever holding your credentials. Salesforce hosts these MCP servers itself, which means Claude never touches your data directly; it sends a request through Salesforce's own infrastructure, and Salesforce decides what comes back.
That distinction matters. The connection runs as the signed-in Salesforce user, not a shared integration account, so every request is filtered through that person's actual object permissions, field-level security, and sharing rules. Claude only ever sees what that user is already allowed to see.
.png)
Why Connect Claude to Salesforce
- Faster answers: ask about accounts, opportunities, or activity in natural language instead of building a report.
- Nothing bypasses security: field-level security and sharing rules apply exactly as they would in the Salesforce UI.
- No shared logins: access runs under each user's own credentials, which keeps audit trails clean.
- Choose the scope: activate only the read-only server, or add full CRUD and metadata access if your workflow needs it.
Before You Begin: Prerequisites
- Salesforce admin access, since every step below happens in Setup.
- An accessible admin email address — Salesforce may send a verification code when you view app credentials.
- A Claude account with connector access (Claude web, desktop, or Claude Code all work).
Step 1: Activate the Salesforce Hosted MCP Servers
Start by confirming Salesforce can reach you, then turn on the specific MCP servers your integration needs.
Confirm your admin email
- From Setup, search for “Users” in Quick Find and open Users.
- Open your own admin user record and check the Email field.
- If you update it, save the record and complete Salesforce's email verification flow.
Turn on the MCP servers
- From Setup, search for “MCP Servers” in Quick Find and open MCP Servers under API Catalog.
- Click Salesforce Servers.
- Activate the servers your use case needs (see below).
.png)
.png)
Step 2: Register an External Client App for OAuth
This app is the trust bridge between Claude and Salesforce. It tells Salesforce which client is allowed to start a login flow, where to send the user afterward, and which scopes it can request. Salesforce still owns login, token issuance, and permissions the app just opens the door.
Create the app
- From Setup, search “External Client” in Quick Find and open External Client App Manager.
- Click New External Client App and fill in the basic details below.
- Expand the API section and check Enable OAuth.
- Set the callback URL to Claude's OAuth callback: https://claude.ai/api/mcp/auth_callback
- Add two OAuth scopes: “Perform requests at any time” (refresh_token, offline_access) and “Access Salesforce hosted MCP servers” (mcp_api).
.png)
- Under Security, uncheck both “Require secret for Web Server Flow” and “Require secret for Refresh Token Flow.”
- Under Security, check “Require Proof Key for Code Exchange (PKCE)” and “Issue JWT based access tokens for named users.”
.png)
.png)
Copy the Consumer Key
- Click Create, then open Settings > OAuth Settings > Consumer Key and Secret.
- Complete the email verification prompt if Salesforce asks for one.
- Copy the Consumer Key somewhere secure this becomes Claude's OAuth Client ID. Only copy the Consumer Secret if your setup explicitly asks for it.
New external client apps can take a few minutes to fully propagate. If Claude reports an invalid_client_id error right after creation, wait a couple of minutes and try again.

Step 3: Connect Claude to Salesforce
With the servers active and the client app ready, the last step happens inside Claude.
- Open Claude, go to Customize > Connectors, click the + button, then Add custom connector.
- Name it something clear, like “Salesforce SObject Read,” and add a short description.
- For the Server URL, use the endpoint that matches the server you activated:
- Open Advanced settings and paste the Consumer Key from Step 2 into OAuth Client ID, then click Add.
- Click Connect, log in to the Salesforce org that holds your external client app, and approve access.
.png)
Testing Your Connection
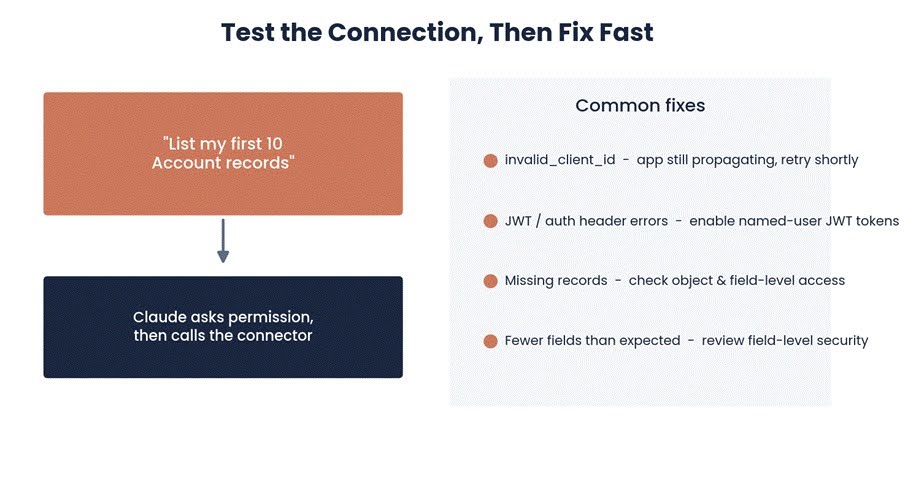
Start a new chat and ask Claude something concrete, like: “List the first 10 Account records you can access in Salesforce, showing name, type, industry, and annual revenue.” Claude should ask permission to use the connector or
Show a visible tool call before answering. Follow up with a reasoning question for example, asking which accounts look most important based on the fields returned and confirm the answer is grounded in the records Claude actually retrieved.
Keeping the Connection Secure
- Grant only the servers a use case actually needs Sobject Reads is enough for most reporting and Q&A work; save Sobject All for cases that genuinely require writes.
- Because access runs as the signed in user, standard profile and permission set changes apply immediately, with no separate integration user permissions to maintain.
- Review field level security periodically, since it's the last checkpoint before any data reaches Claude.